Editing your DNS is extremely simple. All you have to do is add the information and our servers do the rest. It is even possible to use our DNS even when you have hosting located at other providers since we give you full access to your DNS records. We've written this guide to show new users how they can use the DNS on our site.
- You need to first log into your hosting account that you have with us. If you don't have that bookmarked you can get to it by typing yourdomain.com/cpanel replacing yourdomain.com with your actual domain.
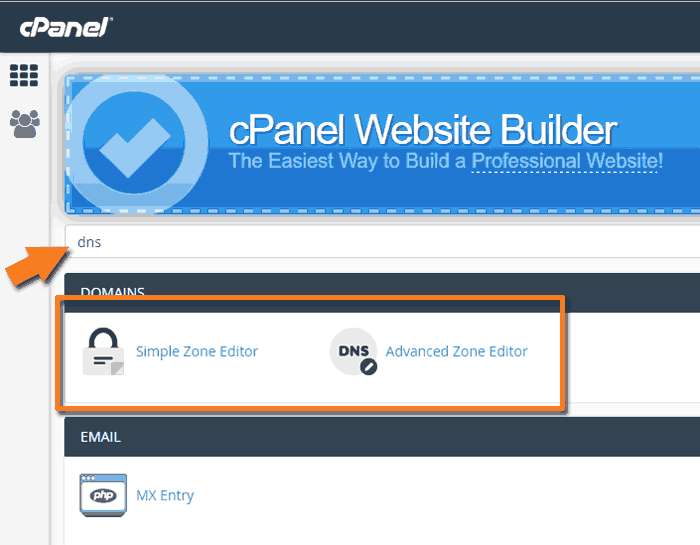
- Once you have logged into your control panel simply type "dns" into the search bar just like the arrow in the below image. You'll then see two options for simple DNS and advanced DNS.
WARNING! Only use Advanced DNS editor if you are 100% sure about what you are doing. It is entirely possible that you can cause your website to stop working by changing, removing or even adding something you shouldn't. If you do mess something up your only option is to undo it or reset your records to default.
Simple DNS editor
The simple DNS editor is.. well simple. This interface lets you add entries that you will use 90% of the time. A records and CNAMES.
- A
- A records stand for "Address Record" and can only be pointed to a single 32bit IPv4 address. (something like 192.168.1.1) You would use this if you want to direct people to an unchanging dedicated IP address such as a website, or other permanent service.
- CNAME
- CNAME Records stand for "Canonical Name Record" this is a single hostname. (something like vs1.tserverhq.com) You would use this if you want that address to go to that hostname. Meaning If visitors typed in record.yourdomain.com they would be directed to record.otherdomain.com without your users ever knowing it went to otherdomain.com. This is very useful when you are given a hostname to use but want your domain being used instead.
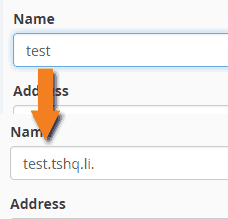
- To add a record in this interface you would simply type the hostname you'd want in the "Name" field. So if you wanted test.tshq.li you would simply type test. The control panel will fill in the rest automatically for you just like the image below shows. If you want to use the root domain instead of a subdomain instead of doing test.tshq.li you would just type thsq.li or in other words type your domain name without the subdomain in front of it.
- Next you would type in the Address or Hostname you would like in the next field. click "Add Record" and you're done. It has been added and should start working right away.
Advanced DNS editor
WARNING! Only use the Advanced DNS Editor if you are 100% sure about what you are doing. It is entirely possible that you can cause your website to stop working by changing, removing or even adding something you shouldn't. If you do mess something up your only option is to undo it or reset your records to default.
When adding records to the Advanced DNS editor your have access to the remaining DNS types such as AAAA, SRV, and TXT.
- AAAA
- AAAA records are the same as A records except they are used for IPv6 addresses instead of IPv4 addresses. Tip: If you want a single hostname to work for both IPv4 and IPv6 then just make the same record with A and AAAA record.
- SRV
- SRV records or "Service Locator Records" are used for newer specifically directed services where you want to create redundancy and directing at the DNS level. This requires extra fields so check with the service provider on how to properly set up the SRV record to work with those services.
- TXT
- TXT records or "Text Records" are a record that will return a set of text when queried. They are mainly used for things like e-mail verification, domain verification and other items and services that make use of TXT records.
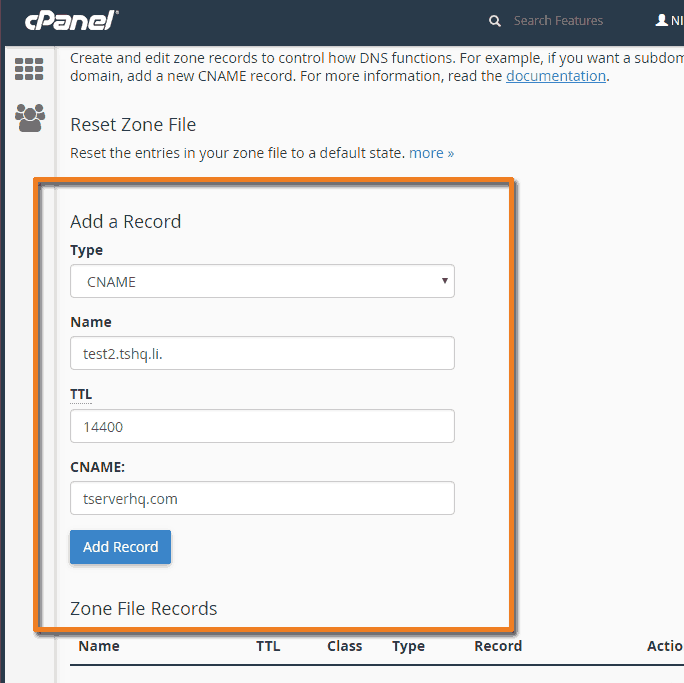
- You shouldn't be making these edits if you don't know what you're doing so this part of the guide is probably useless but just in case we have made these steps. To add your record you simply fill in each line of data. We'll go over each one. The first one being "Type" select the type of record you'd like to create.
- Next is name. Just like before simply put in the hostname that you want and the panel will fill in the rest for you. If you put in test it will automatically fill in the rest of the record. If you want to use the root domain instead of a subdomain instead of doing test.tshq.li you would just type thsq.li or in other words type your domain name without the subdomain in front of it.
- Next is TTL. TTL stands for "Time To Live" This is how long in seconds that the record will stay cached on a users device. For speed and efficiency you should make this as long as you can. 86400 seconds is 1 day. By default critical records are 14400 seconds or 4 hours. We suggest values between 1 hour and 1 day preferring the longer period so users are happy. You can set the TTL to any value you wish but keep in mind these two rules.
- If the TTL value is too short most devices will default to their default value usually 86400 one day so we suggest never setting it any lower than 300 (5 min) this low value can still cause issues with some users though so use it with care.
- If the TTL value is very long and the record needs to be changed your users won't see the change for that amount of time. We suggest no longer than 86400 (1 day).
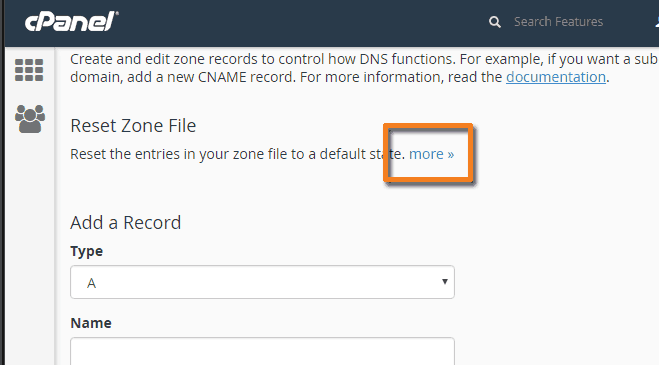
Resetting Everything
Sometimes users make mistakes and mess up their DNS. If this ever happens simply reset the zone file. This means it will delete everything. and set it back to when it was working. So before you do this make a note of the things you know you want to keep. But you'd simply click the "more" button in the Advanced DNS Editor, read the warning, tick the box confirming you want to erase everything and then reset the zone file.