A brief overview of users in TeamSpeak 3
The mechanism controlling user permissions on a TeamSpeak 3 server is fundamentally different than in TeamSpeak 2. In TeamSpeak 2 individual users were added to the server's database and permissions bound to a user login name and password. In TeamSpeak 3 user login names and passwords no longer exist. Instead users connect to a server providing just a nickname, which is only used for how to display the user to others but in no way related to access control. To identify a user on a TeamSpeak 3 server, a public key encryption mechanism is used: When the Client is started for the first time; it automatically creates a key pair consisting of a public and a private key.
The first time a new user connects to a virtual server; his client will automatically send his public key to the server. The virtual server creates a unique identifier from this public key and stores this identifier in its database. So instead of identification with login and password, a TeamSpeak 3 server identifies users by their unique ID. Should the user delete his private key and create a new one when connecting, he will be treated as a new individual by the server.
Since there is no input needed to "register" on a TeamSpeak 3 server there is no such thing as a manual registration in TeamSpeak 3. Basically once you connect you are automatically registered on the server you connected to. When you join again the server will recognize you.
Making Privilege Keys
One way to assign users to different groups and give them special privileges is to give them a Privilege Key that they can use. Once they use this Privilege Key they will then have access to all their rights every time they connect.
Once a Privilege Key is used it can't be used by anyone else. You need to make a new Privilege Key for each person.
Step 1 - Finding your Privilege Key manager
When you connect to a server for the first time you will notice that you don't have any rights or permissions unless the server owner has given the default user more rights. If this is the case you will need to get your own Privilege Key from the server master or from your setup email.
You can assign a certain server groups as the default user group. This means whenever a new client connects to your server they will automatically be in that group without getting a Privilege Key from the server.
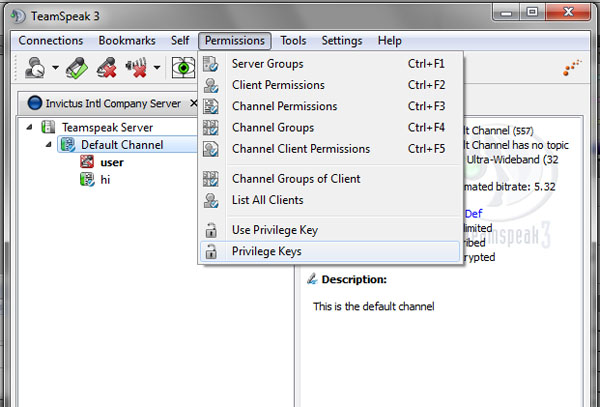
You will now want to get to your Privilege Key Manager. You can find this in the permissions tab at the top of your TeamSpeak 3 window.
If you can't select the Privilege Key Manager then you don't have enough rights to make or modify Privilege Keys. You will need to get a hold of one of your server admins in order to get those rights.

�
Step 2 - Knowing your Privilege Key Manager
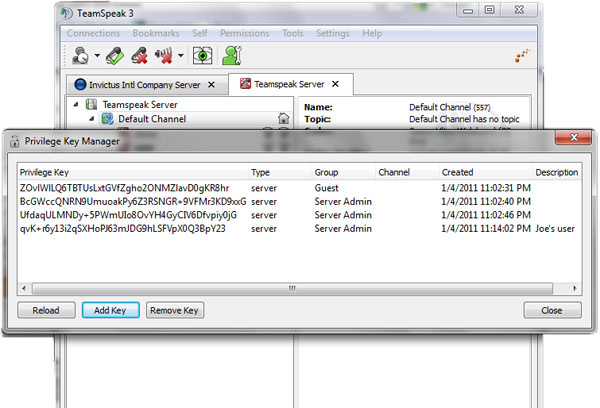
When you open your Privilege Key manager there may or may not be Privilege Keys showing up. This is because only unused Privilege Keys will show up here. Once a user uses their Privilege Key it will disappear from the Privilege Key manager. Let's go through what each column means
Privilege Key - This is the unique Privilege Key that the user can put into the system to gain their rights
Type - This will tell you what type of Privilege Key it is. This will correspond to the different types of groups such as server and channel.
Group - This is the name of the group that the Privilege Key belongs to. So if the Privilege Key says "Server Admin" it means that once the client uses that Privilege Key they will then be a part of the Server Admin group.
Channel - If the Privilege Key type belongs to a channel then the specified channel will be listed in this section.

�
Step 3 - Adding new Privilege Keys
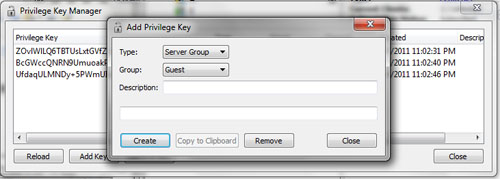
When you click on the Add Privilege Key button you see a new window. In this window you will see 2 drop down boxes. One with the type of Privilege Key it will be and then the group it will belong to. Below that is a white space this is where the Privilege Key will show up once you generate it.

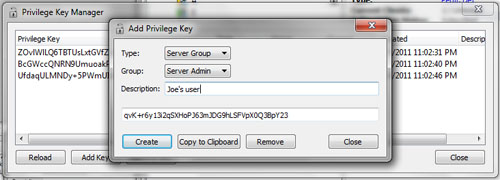
Now what you will want to do is press the "Create" button. This will generate the Privilege Key according to the settings you specified for it. So in our picture below we made a Privilege Key that is for a server group and that server group is Server Admin.
Any client can be assigned to as many groups as they like. This in most cases is impractical as someone with more privileges would have no need to be in a group with less. This is helpful though if you have custom icons assigned to certain groups.

�
Step 4 - Spreading the love
Now that you have created your Privilege Key you have 2 options for getting it to the other users. You can immediately click on "Copy to Clipboard" or you can click the close button and wait until later. If you wait until later you can always right click on the Privilege Key in Privilege Key Manager and you will be able to copy it to the clipboard there as well.
One clever way to manage users without letting it get out of control is to allow a certain set of users to view Privilege Keys only and not be able to create them. In this way you can limit how many people have full use of the server.
Example: So you could make 10 Privilege Keys for group A. A new user gets on and wants to become a part of group A. Well if a server admin isn't on then someone group A could give that new user a Privilege Key to become part of group A.
